

It is no secret that I love and have a soft spot for mid-century furniture. To me, there's nothing better than finding an unloved mid century piece that is in desperate need of repair and then giving it a second life. My friend Tiffany and I had a vintage booth for a while where we would sell our vintage wares. Not only was it a blast for us but we learned so much about refinishing vintage furniture. Mainly trial and error, error and error, etc. :-) Here is a little look at what our booth looked like...

I'm starting the blog off right with my very first furniture redo (ever)...
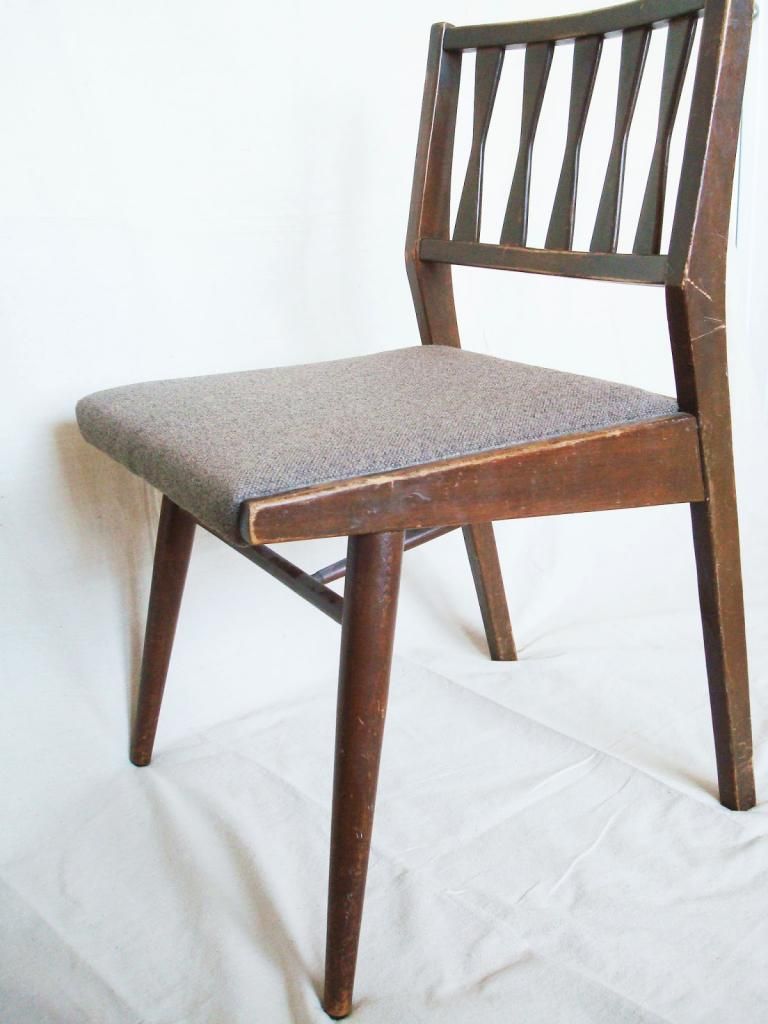
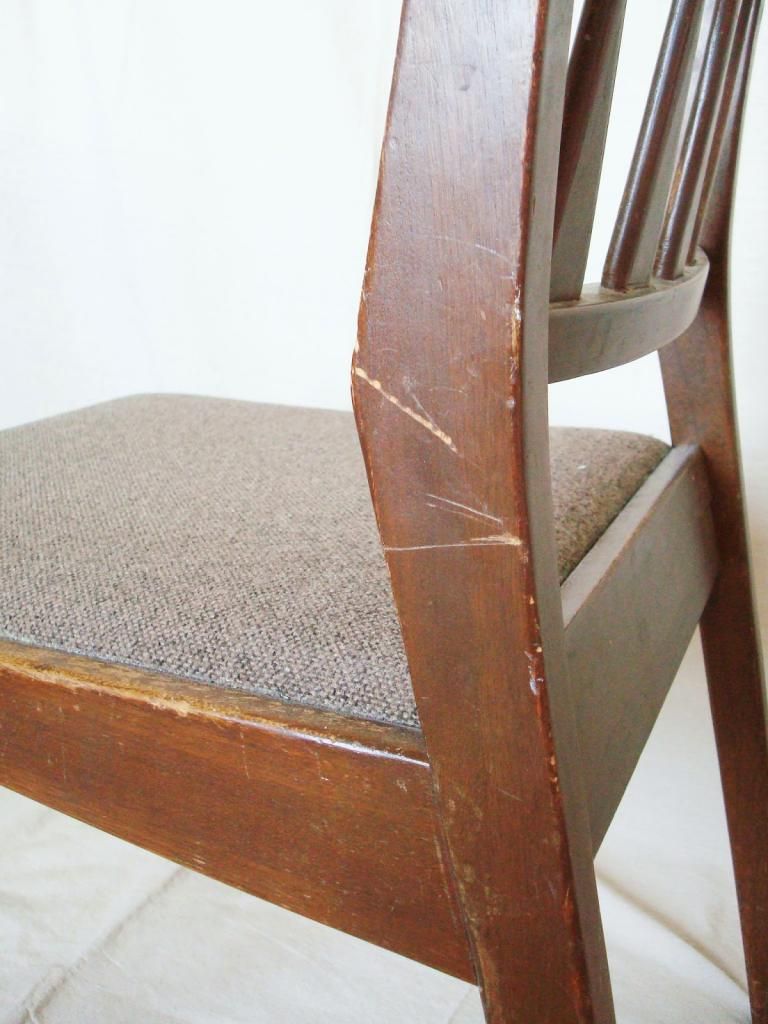
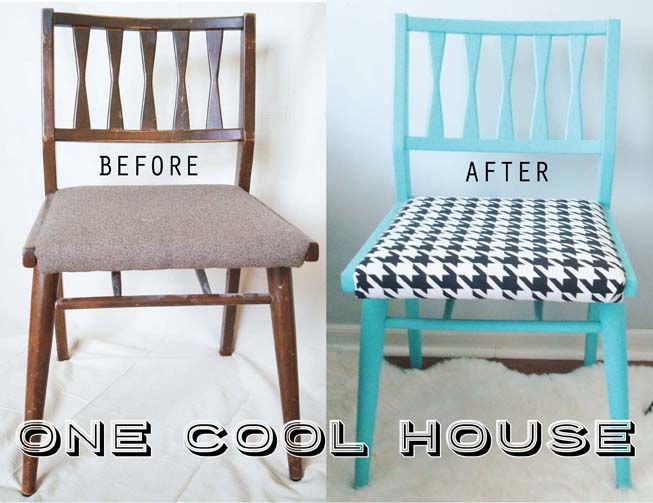
The chair below, which is actually a pair of two identical chairs, was such a great find. I found these chairs at Goodwill for $12. $12 for the pair. I was in love. I love the detail on the back of the chairs and cool angles of the legs and sides. The wood was in pretty good shape, just had a lot of scratches and some parts that needed some good ole' wood glue to keep the chair sturdy. But the fabric was the worst part. A dark brown, rough, itchy, commercial-carpety (I think you get the feeling) kind of fabric. I could not wait to start this redo!
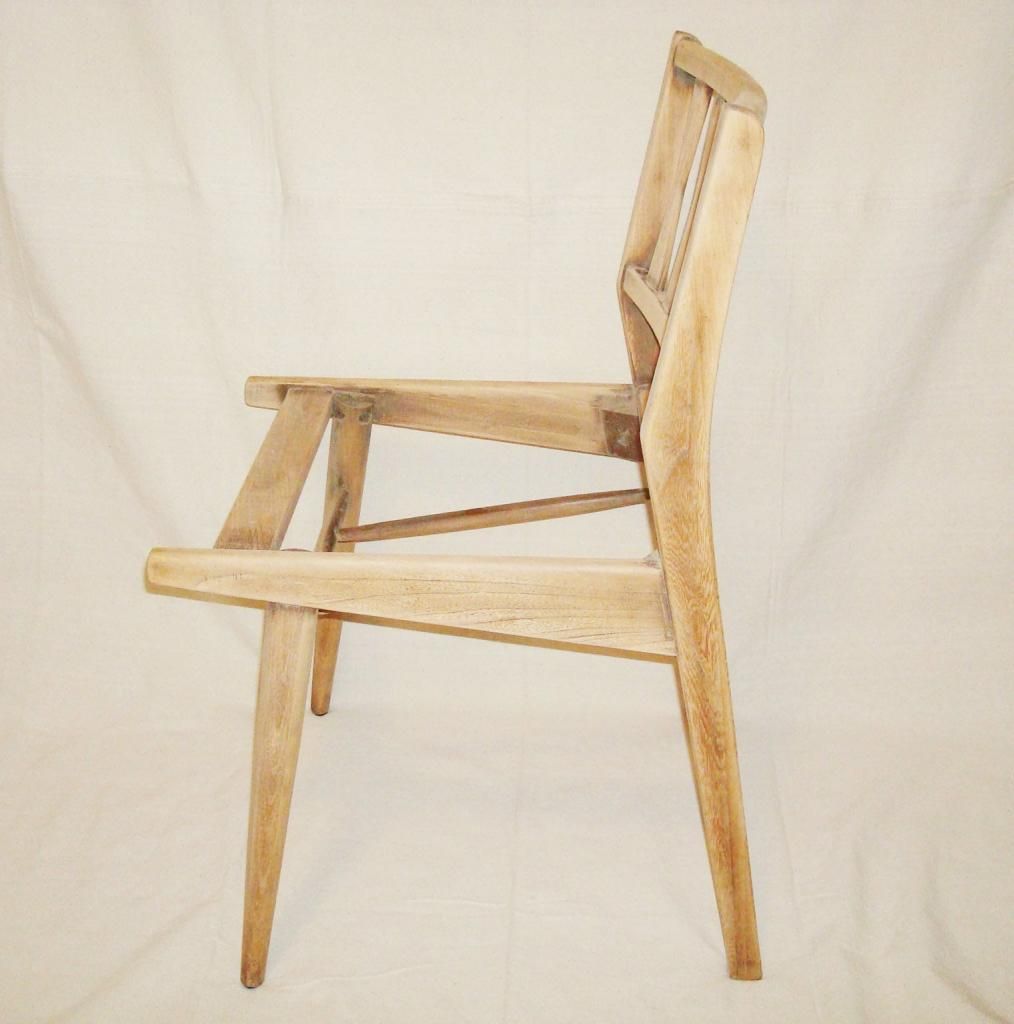
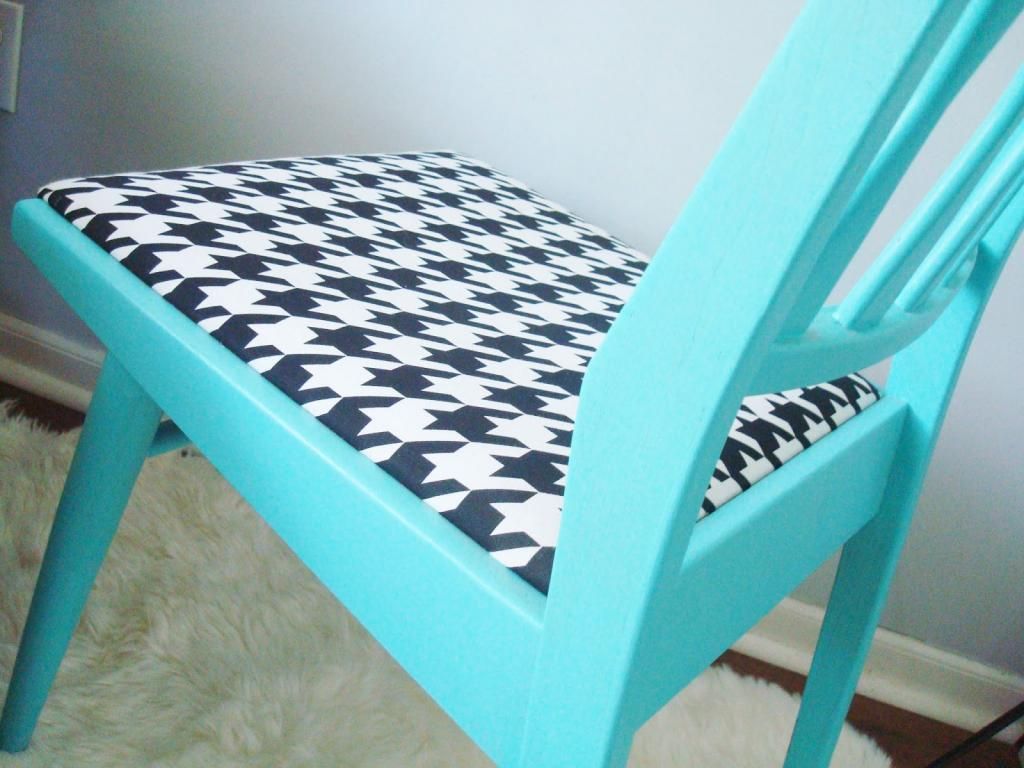
I considered sanding these babies down and doing more of a clear coat or light stain to show the grain of the wood. But as I sanded, the wood didn't look so hot to go with this option. So my love of turquoise and all around brightness won over. I chose an awesome turquoise paint swatch, some cool Houndstooth fabric from Hob Lob and went to town. So if you find yourself staring at a beaut of a chair that needs some work, it really is an EASY undertaking. Easier than a big dresser with lots of nooks and crannies. A great place to start if it is your first redo for sure. The most time consuming part is sanding. Just follow these easy steps:
+ First, just make sure to dust/rub down your chair to get excess dirt off. It helps you see what you're working with, but you don't need it to be crazy clean because you will be sanding next. Go ahead and remove the seat by just unscrewing it. Be sure to put all of your hardware in a plastic bag for safe keeping.
+ I sanded them heavily with sanding blocks like these. I find it best to use a coarse grit to start and then end with a more fine grit. The sanding blocks are great because they are easy to hold and you can even rinse and reuse them. You can also use a power sander if you have one. I didn't use mine on these because I felt I had more control with the sanding blocks.
I did a deep sanding job because I wanted to smooth out a lot of the scratches and nicks. You do have some options here though. You can lightly sand if your piece is in good shape and use a good quality bonding primer like Glidden Gripper. This will help your paint really adhere to the surface. (Note: for the Glidden primer, use the white primer for light colored paints and the grey one for more vivid colors.)
+ So you've either sanded or lightly sanded. Now the fun part! The COLOR or final paint of your choice! For mine, I sanded and used the Behr Paint and Primer in One. I highly recommend this paint! We have used this to paint every room in our home. It saves so much time and the color range is great. You will need at least two coats but three if it helps your color become more vibrant. I did two coats and after the first coat is dry, I really took a look at my chair under good lighting. I missed a lot of little areas and was able to cover them with the second coat just fine.
+ Once you've got a nice even coated chair with gorgeous looking color, you have some options as far as sealing. I did not seal mine, but for a piece that you will use heavily its not a bad idea. There are two options for sealing, a clear polyurethane topcoat or some people like to use wax. With waxing, you wax on wax off Daniel Son style and buff it out. With the poly coat, you just paint it on. I have used this Minwax finish on our stair project and found it very easy to use.
***And now for the final product....***
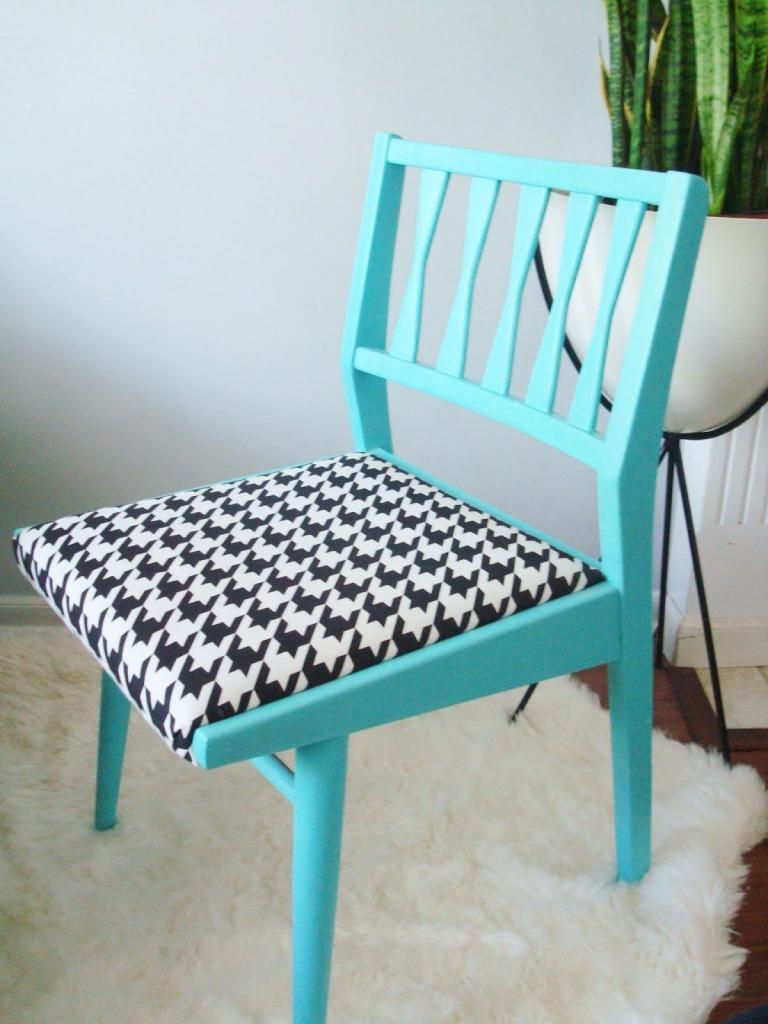
Oh la la...
Sorry, Eddie photobomb...he's just so passionate about vintage furniture :-)

As far as reupholstering the seat, don't be intimidated. This was my first time recovering anything. All you need is a pair of scissors to cut your fabric and a staple gun to secure your fabric in place.
+ First, lay down your existing grossly covered seat on top of your new, awesome fabric. With the print or pretty side of your new fabric facing down. Leave roughly an 1 1/2 to 2 inches extra on all sides. Now, cut your piece of fabric out.
+ Next, I would highly recommend checking out how the original fabric was folded over and stapled. This will just give you a good, general idea of how you'll staple things down. But you don't need to follow exactly how it was done. I like to start with the sides and save the front and back for last. Start with one side and starting in the middle of the seat, staple all the way down the side leaving about a half inch in between each staple. Now, when you do your other side, be sure to start again in the middle and pull your fabric extremely snug and tight!
+ Once, you've got your sides done, your main issue will be how to fold your corners. It's not that bad. The basic step with folding your corners is you want to create a pleat. I know, pleats are bad when it comes to pants but in this case they're okay! :-) To pleat your corners, pull your pointy corner back towards the center of the seat and staple. Now pull each side back toward the center again and staple each side down. Here is a look at the front of my seat...

+ Now once you get your corners pleated and stapled down, just screw your seat back in and you are good to go! If you have excess fabric above where you've stapled, you can just trim that stuff off. And there you go, you've got yourself one fancy chair! Taking a piece that was less than desirable and making it awesome again is a great feeling. Sit back, relax and stare at the amazing thing you just made (better)!
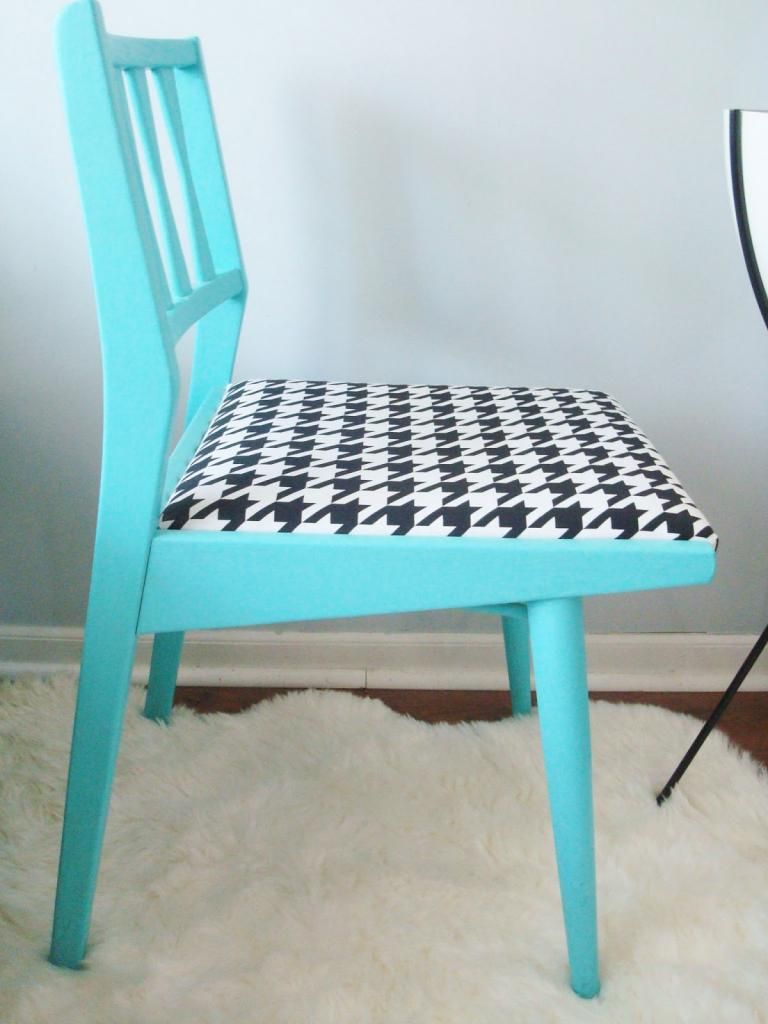
Now, one last gratuitous before and after shot....
E-mail me if you have any before and after shots you'd like to share. Or if you found this tutorial helpful! I love seeing how other people reinterpret their vintage finds, everyone has their own style and it really comes through when you're redoing furniture like this. Hope you've enjoyed this vintage furniture redo!
Love your blog! What type of paint do you recommend for painting furniture ?
ReplyDeleteHi there! And thank you! :-) I really love the Behr Paint and Primer in One that I mentioned above. It is water based and therefore dries faster, is easier to cleanup (soap and hot water) and gives great coverage. I've found it to be really durable as well.
ReplyDeleteChalkboard paint covers well without a primer but I've found it doesn't hold up quite as well as the Behr paint in the long run.
While oil based paint offers great durability, it takes longer to dry. Because of that though, it evens out brush strokes much better than others. Be prepared for a strong odor with oil based paints. Not to mention cleanup is a bit tougher, you'll need mineral spirits.
I hope this helps! And best of luck with your next project, send me some pictures! :-)
-Danielle